Great Basin National Park Astrophotography Guide 2026
Why Great Basin belongs on an astrophotography list
As an Amazon Associate, ExifGrabber earns from qualifying purchases.
Great Basin National Park protects high desert, ancient bristlecone pines, alpine terrain, and some of the darkest skies in the contiguous United States. Its distance from major cities, low humidity, and large elevation range can deliver strong Milky Way contrast and clear views deep into the night sky.
The same qualities make the park demanding. Services are limited, cell coverage is unreliable, nighttime temperatures fall quickly, and the paved Wheeler Peak Scenic Drive climbs from roughly 6,700 feet to more than 10,000 feet. Weather at the upper trailheads can be completely different from the entrance near Baker.
This guide treats Great Basin astrophotography as a location-planning problem first and a camera-settings problem second. Scout in daylight, check current road and fire conditions, choose a safe foreground, and build a repeatable exposure before darkness removes the visual cues around you.

Understand the park before darkness
Great Basin is not a compact overlook park. The Lehman Caves Visitor Center and Astronomy Amphitheater sit near 6,825 feet. Mather Overlook lies along Wheeler Peak Scenic Drive. The road continues toward alpine trailheads near 10,000 feet when weather permits. Baker Archaeological Site and the Ranching Exhibit offer lower-elevation alternatives outside the steepest part of the drive.
Most park roads are generally open from late spring into fall, but snow can close high sections at any time. Wheeler Peak Scenic Drive is paved, narrow, and curving. Vehicles longer than 24 feet face restrictions beyond Upper Lehman Creek Campground. Dirt and gravel roads elsewhere require conditions appropriate to the vehicle.
Check the park's current conditions on the day of arrival, then ask a ranger about overnight access and recent hazards. A location that was open when an itinerary was written may be affected by snow, fire restrictions, construction, or a full parking area.
Do not rely on a single offline map pin. Download maps before the trip, tell someone the plan, carry more water than a normal evening outing, and leave enough fuel to reach Ely or another reliable service area.
Best Great Basin night-sky locations
The park identifies several established stargazing areas. Each supports a different foreground and level of access.
Astronomy Amphitheater
The purpose-built amphitheater near the Lehman Caves Visitor Center hosts ranger astronomy programs during the warmer season. It offers open sky, familiar access, and a natural starting point for visitors who do not want to navigate a trail at night.
Program nights prioritize shared viewing. White lights disrupt night vision, tripods can block circulation, and a photography setup should never interfere with telescopes or visitors. Use a dim red-light headlamp, arrive early, and follow ranger instructions.
Mather Overlook
Mather Overlook provides an elevated view from Wheeler Peak Scenic Drive. Mountain silhouettes and the broad basin can anchor the sky without a long hike. Scout the pullout, railings, horizon, and safe tripod positions before sunset.
A bright moon can model the landscape, while a moonless night reveals more stars. Wind can be stronger than it appears lower in the park. Keep the tripod compact, weight it safely, and avoid extending the center column.
Baker Archaeological Site
This lower site outside the main mountain road offers broad sky and less exposure to alpine weather. The remnants and open basin can create a subtle foreground, but cultural resources must remain untouched. Stay on established access, use only open public areas, and do not move objects for a composition.
Ranching Exhibit
The Ranching Exhibit along Highway 488 can provide accessible foreground structures under a wide sky. It suits a first-night session because the approach is simpler than an unfamiliar mountain trail. Scout for vehicle headlights, safe parking, and the direction of the Milky Way before committing to a frame.
Bristlecone pine areas
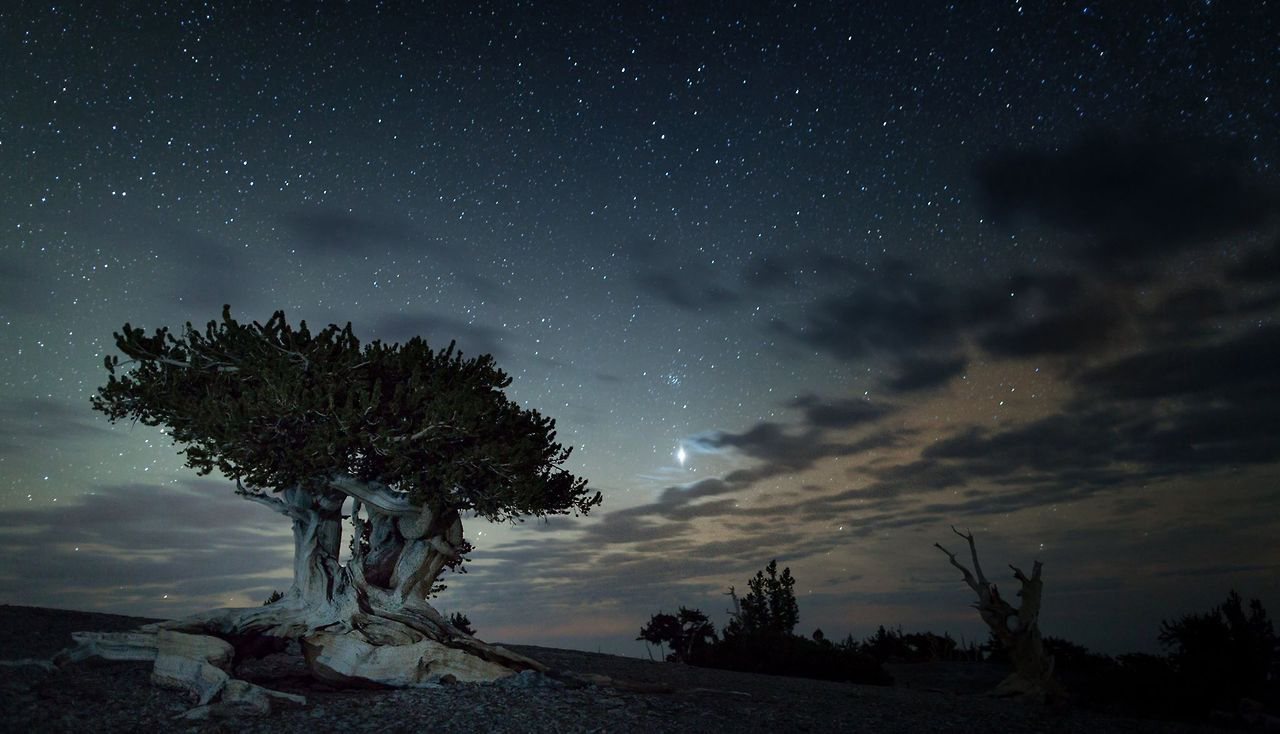
Ancient bristlecone pines create extraordinary shapes against the stars. They also grow in sensitive high-elevation terrain reached by real hiking trails. Photograph only from legal routes and durable surfaces. Never touch, climb, illuminate aggressively, or step around barriers to isolate a tree.
The safest plan is to scout the complete route and composition in daylight, confirm road and trail status, and return only if navigation, weather, altitude, and group experience support it. A beautiful tree is not permission to improvise in the dark.
Plan the Milky Way and moon
The bright galactic core is most accessible in the Northern Hemisphere from spring through early fall. In early season it appears late at night or before dawn. Around summer it becomes visible earlier and stands more vertically. By early fall it shifts west earlier in the evening.
Use a planning app to check the core's azimuth and elevation for the exact date and pin. The mountain horizon can hide the galaxy after the app says it has risen, so include local terrain in the plan. Our PhotoPills golden hour planning guide explains the mapping and augmented-reality tools that also support night work.
A new moon is not automatically best. No moon maximizes star contrast but leaves the foreground nearly black. A thin crescent or moon below the horizon during the main exposure can provide scouting light without washing out the core. A brighter moon can illuminate mountains and trees for a blue-hour-like night landscape.
Separate the foreground and sky when their ideal light does not overlap. Make a foreground exposure during blue hour or moonlight without moving the tripod, then photograph the stars after the sky darkens. Blend only with clear editorial intent and disclose the composite when context requires it.
Clouds, wildfire smoke, dust, humidity, and wind matter as much as lunar phase. A nominally clear forecast can still reduce contrast near the horizon. Check more than one forecast, look at satellite imagery, and keep an alternate subject for a night when the core disappears.
Camera settings for untracked Milky Way photos
Begin with a full-frame wide-angle lens around 14mm to 24mm, though crop-sensor cameras work well with an appropriately wide lens. Mount the camera on a sturdy travel tripod and disable optical or sensor stabilization when the camera is locked down.
Use this starting range:
| Setting | Starting point | Why |
|---|---|---|
| File type | Raw | Preserves white balance and shadow latitude |
| Exposure mode | Manual | Keeps frames consistent |
| Aperture | f/1.4 to f/2.8 | Gathers light before stars trail |
| Shutter speed | 8 to 20 seconds | Balances star shape and exposure |
| ISO | 1600 to 6400 | Raises the captured signal to a usable level |
| White balance | 3800K to 4300K | Provides a neutral preview, adjustable in raw |
| Focus | Magnified manual focus on a bright star | Avoids autofocus hunting |
| Delay | Two seconds or remote release | Reduces movement at the shutter press |
The old 500 rule often permits visibly elongated stars on high-resolution sensors. A conservative shutter based on the NPF rule or a magnified test frame is safer. Start at 10 to 15 seconds with a 20mm-class lens, inspect stars near the frame edge, then lengthen only if their shape remains acceptable.
Expose far enough to move the sky data away from the left edge of the histogram without clipping bright stars or illuminated foregrounds. A dark camera preview can be misleading in the field because your eyes are adapted to darkness. Trust the histogram, highlight warnings, and a magnified frame.
If stars trail before the exposure is bright enough, open the aperture or raise ISO. Do not underexpose several stops merely to preserve an arbitrary ISO number. Noise reduction has more useful data when the original exposure contains a healthy signal.
Nail focus in complete darkness
Switch the lens and camera to manual focus. Find a bright star or distant light, magnify live view as far as practical, and rotate focus until the point looks smallest and most defined. Infinity markings are starting references, not guarantees.
Take a test frame and inspect the center and corners. A fast wide lens may show coma, astigmatism, or soft corners at its maximum aperture. Stopping from f/1.4 to f/2 or from f/2 to f/2.8 can improve star shapes enough to justify the ISO increase.
Tape the focus ring with removable photography gaffer tape only after confirming it. Temperature changes can shift focus during a long session, so recheck after the lens cools and whenever the camera receives a bump.
Foreground focus requires a separate decision. A distant mountain can remain acceptably sharp at the star setting. A pine, sign, or structure close to the camera may need a second focused exposure or a smaller aperture during blue hour. Do not assume f/2.8 will hold a foreground two feet away and the stars in one plane.

Build a foreground that belongs to the park
A dark sky alone can look interchangeable. Great Basin becomes recognizable through bristlecone forms, Wheeler Peak, basin horizons, visitor structures, and the relationship between desert and alpine terrain.
Scout for silhouettes that remain readable at thumbnail size. A single branching tree, a low ridge, or an observatory shape gives the eye a place to begin. Avoid a tangled horizon that merges with the Milky Way's brightest structure.
Use a normal or short telephoto lens for a panorama when an ultra-wide frame makes the core too small. Make a single row of overlapping vertical frames with manual exposure, manual focus, and fixed white balance. Rotate level and overlap each image by about one-third.
Light painting can overwhelm the scene and may disturb wildlife, visitors, or astronomy programs. Prefer moonlight, blue hour, or a low, brief light applied only where rules and nearby people allow it. Never shine a light toward drivers, telescopes, campers, or animals.
The foreground does not need equal brightness with the sky. Deep shadow can communicate the park's darkness. Lift enough detail to show form without turning night into midday.
Stack images for lower noise
Sky stacking combines several identical short exposures to reduce random noise while software aligns the stars. It is useful when a single frame at ISO 6400 looks rough or when the lens cannot open wider.
Make 8 to 20 sky frames without moving the tripod. Leave only a brief interval between them so software can align the star positions. Capture a separate foreground frame if trees move or the land needs a longer exposure.
Turn off long-exposure noise reduction during a sequence because the camera would make a dark frame after every exposure and create large gaps. Capture several manual dark frames with the lens cap on at the end if the chosen workflow uses them.
Stacking does not rescue bad focus, clipped highlights, heavy clouds, or a moving tripod. Review a frame before committing to the series. Wind vibration repeated across 15 exposures remains vibration.
For a complete capture and editing workflow, use our beginner astrophotography guide and Milky Way editing tutorial.
Use a tracker carefully
A portable star tracker follows the sky's rotation and supports longer exposures at lower ISO. It can produce cleaner detail in the Milky Way and expand the lens choices beyond ultra-wide angles.
Tracked stars make the ground blur, so most landscape results combine a tracked sky with a stationary foreground from the same tripod position. Accurate alignment, a stable support, and a clear view of the celestial pole are required. At 10,000 feet in the wind, a tracker that aligned smoothly at home can become a frustrating system.
Practice before the trip. Our polar alignment guide explains the process, while the best star trackers guide compares portable options.
Limit the first Great Basin night to an untracked setup if the location is new. A clean frame from a safely scouted overlook is better than spending the whole dark window troubleshooting a mount.
Photograph stars in autumn and winter
By October, the galactic core is visible for a shorter window and moves toward the western horizon earlier. The Orionids can add meteors later in the month, although no camera can predict where an individual streak will cross the frame. Keep making wide, continuous exposures while the radiant is active.
Winter replaces the summer core with Orion, the Pleiades, and bright northern constellations. Snow can reflect starlight and create a luminous foreground, but high roads may close and temperatures become serious. Lower-elevation locations are the practical choice when the scenic drive is unavailable.
Condensation and frost can form on the front element. A low-power lens dew heater helps, but it consumes battery. Keep spare batteries warm inside a layer, avoid breathing on cold glass, and carry a dry microfiber cloth for emergencies.
Do not treat an astronomy trip as a reason to ignore winter driving limits. If snow begins, leave while the route remains clear. A missed sky window is less costly than a stranded vehicle after midnight.
Respect dark-sky etiquette
Human eyes can take about 20 to 30 minutes to adapt fully to darkness. One white headlamp or car door light can undo that progress for everyone nearby. Use red light at the lowest practical brightness and point it at the ground.
Dim the camera screen, disable autofocus-assist lamps, and cover unnecessary status lights. Finish equipment assembly before entering a shared viewing area. If a bright light is necessary for safety, announce it and use it briefly.
Do not leave a vehicle idling for warmth near observers. Headlights, exhaust, and noise affect the experience. Park facing away from the viewing area when possible and know how the vehicle's automatic lights behave before arrival.
The park's 2026 Astronomy Festival ran September 10 through 12 with telescope viewing, talks, observatory tours, and Milky Way photography sessions. Regular ranger astronomy programs generally continue on a reduced schedule into October. Event schedules change, and some activities require registration, so confirm the current calendar before planning around one.
Permits and responsible photography
As of the park's 2026 guidance, a small group of eight or fewer people using hand-carried equipment in public areas generally does not need a still-photography permit when it does not claim exclusive use, damage resources, affect visitors, or create added administrative cost. More complex work can require a permit.
Photography inside Lehman Caves follows separate rules and requires an arranged after-hours cave photography tour. Do not assume normal night-sky access extends into caves or other non-public spaces.
Tripods are tools, not reservations. Keep paths, pullouts, amphitheater routes, and viewpoints open. Yield to visitors, avoid fragile soil and vegetation, and remove every tape marker or piece of packaging.
Commercial intent does not excuse resource impact. If the plan includes a crew, models, extensive lighting, staging, or exclusive access, contact the park well before the trip.
Night safety at high elevation
Altitude can cause headache, nausea, fatigue, and poor judgment. Ascend gradually, hydrate, avoid overexertion, and move lower if symptoms worsen. Cold and wind amplify fatigue even in summer.
Pack insulated layers, gloves that still operate controls, water, food, a map, a first-aid kit, and an independent light source. Carry a backup white light for emergencies even though red light is preferred during normal photography.
Summer afternoons can bring thunderstorms. Lightning risk continues even when sunset produces a clear gap near the horizon. If thunder is audible or clouds rebuild over the range, leave exposed viewpoints and high terrain.
Wildlife moves after dark, and deer can enter the scenic drive. Reduce speed, use designated pullouts, and never stop in a travel lane to photograph an animal or sky alignment. At the end of the session, make a deliberate gear count before driving.
A two-night Great Basin plan
Night one: Learn the sky from lower elevation
Arrive early enough to check conditions and scout the Astronomy Amphitheater, Ranching Exhibit, or Baker Archaeological Site. Choose one location with direct access and an unobstructed horizon. Make the foreground during blue hour, then establish focus and exposure as the first stars appear.
Use the first dark hour to refine technique. Make a single untracked frame, inspect star shape, and create a short stack. Record a few vertical frames for a panorama only after the primary composition is secure.
The goal is not maximum variety. It is learning the park's darkness, temperature changes, vehicle-light patterns, and your own workflow without a complicated night hike.
Night two: Add elevation and a stronger foreground
If the scenic drive, weather, and your physical condition are suitable, scout Mather Overlook or an established high-elevation trail area in full daylight. Mark legal tripod positions and note every turn on the return route.
Photograph sunset and blue hour without moving the final composition. When darkness arrives, make the sky sequence and one alternate frame rather than repeatedly rebuilding the setup. Leave before fatigue, frost, or weather turns the descent into a problem.
If the high road is closed, return to a lower site with a different Milky Way direction or foreground. A safe alternative is not a failed plan. Great Basin's dark sky extends far beyond one overlook.
Organize and protect the files
Back up after each night before formatting a card or clearing internal storage. Keep one copy on a travel drive and another on separate media. A remote park is the wrong place to discover that the only copy remained in a cold camera bag.
Use metadata to evaluate the sequence. The EXIF viewer shows shutter speed, aperture, ISO, focal length, and capture time. The GPS location extractor can confirm coordinates when the camera or phone recorded them.
Precise coordinates deserve judgment. Established overlooks can be named. Fragile bristlecone positions, unofficial paths, and sensitive foregrounds should not be published merely because the location exists in a file. Remove GPS metadata with the EXIF remover before sharing when coordinates could encourage resource damage.
Keep a field note that separates sky, foreground, dark, and tracked frames. A filename alone may not reveal which images belong in a stack after a long trip.
Final Great Basin checklist
- Check current roads, weather, fire restrictions, and astronomy events.
- Download offline maps and tell someone the location and return time.
- Scout the complete route and foreground in daylight.
- Plan Milky Way and moon position for the exact pin.
- Begin around f/1.4 to f/2.8, 8 to 20 seconds, and ISO 1600 to 6400.
- Magnify a bright star to confirm manual focus.
- Carry red and emergency white lights, warm layers, water, and spare power.
- Keep lights away from visitors, drivers, wildlife, and telescopes.
- Stay on legal durable surfaces and protect cultural resources.
- Back up every session and consider removing sensitive GPS data.
Final perspective
Great Basin does not require exotic equipment to produce a memorable night photograph. A wide lens, stable tripod, careful manual focus, and well-exposed raw file can record a sky that many photographers never see at home.
The park rewards preparation more than improvisation. Learn the road in daylight, match the location to the moon, protect the foreground, and make a short repeatable sequence. Darkness becomes an advantage only after safety and access are settled.
Treat the night as part of the resource, not merely a background. When red lights stay dim, tripods remain out of paths, and fragile terrain is left untouched, the same clear sky remains available to the next photographer.