Zone System for Digital Photography: A Practical Exposure Guide
Use zones to decide how tones should look
As an Amazon Associate, ExifGrabber earns from qualifying purchases.
The Zone System turns exposure from a meter reading into a creative decision. Instead of asking whether the camera's indicator sits at zero, you decide how bright or dark an important part of the scene should appear. You then expose so that tone lands where you intended while checking whether the rest of the scene fits inside the camera's usable range.
Ansel Adams and Fred Archer developed the original system for black-and-white sheet film, where exposure controlled shadow detail and development changed negative contrast. Digital cameras do not let you develop one part of a raw sensor differently from another. The central idea still works: measure scene brightness, place a chosen tone, predict where other tones will fall, and protect information that the sensor cannot recover.
This guide adapts that idea to raw capture, in-camera spot metering, live histograms, highlight warnings, and modern editing. You do not need to memorize eleven labels before taking a photograph. Start with three useful anchors: textured shadows, middle tones, and important highlights.

Understand the eleven-zone scale
The classic scale runs from Zone 0 to Zone X. Each adjacent zone differs by one stop of light. Zone V represents a middle tone, Zone 0 represents featureless black, and Zone X represents paper white or a similarly featureless bright value. The useful photographic detail usually sits between those extremes.
| Zone | Relative to Zone V | Practical digital interpretation |
|---|---|---|
| 0 | 5 stops darker | Black with no recoverable detail |
| I | 4 stops darker | Near-black separation from pure black |
| II | 3 stops darker | First faint shadow texture |
| III | 2 stops darker | Dark texture that should remain readable |
| IV | 1 stop darker | Dark foliage, stone, fabric, or skin as intended |
| V | Meter reading | Middle tone, not a universal subject color |
| VI | 1 stop brighter | Light skin, stone, or foliage when rendered bright |
| VII | 2 stops brighter | Bright texture that should remain distinct |
| VIII | 3 stops brighter | Delicate highlight texture near the upper limit |
| IX | 4 stops brighter | Near-white with little texture |
| X | 5 stops brighter | Featureless white or a light source |
The table describes relationships, not fixed real-world objects. Snow can belong on Zone VII, VIII, IX, or X depending on light and intent. Dark skin does not belong on one prescribed zone. Place it according to the lighting, desired rendering, and the person's actual tonal relationships. The system helps you preserve intention, not force every subject into a formula.
A reflected-light meter assumes that whatever it measures should reproduce near a middle value. Point it at bright snow, and an uncorrected reading tends to darken the snow. Point it at a black coat, and the reading tends to brighten the coat. Zone placement tells the camera that the snow should be brighter than the reading or the coat should be darker.
Place a tone with spot metering
Use the camera's spot-metering mode or a handheld spot meter to isolate a small area. Choose a tone that matters to the photograph and decide where it should appear. Meter it, then shift exposure by the number of zones between the meter's Zone V assumption and your chosen placement.
Suppose a shaded rock must retain dark texture. Meter the rock, then reduce exposure by two stops to place it on Zone III. If the meter suggests 1/30 second at F8 and ISO 100, use 1/125 second at F8 and ISO 100. The rock receives two stops less light than the Zone V reading and should reproduce as a textured dark tone.
For bright textured snow, meter the snow and add two to three stops, depending on the camera and desired brightness. A two-stop increase places the snow near Zone VII. A three-stop increase places it near Zone VIII. Check the raw-oriented histogram or highlight warnings because a camera's meter, picture style, and headroom vary.
Manual exposure makes this relationship clearest. Aperture priority also works when you apply exposure compensation. If the light remains constant, lock the resulting exposure rather than letting the meter change as you reframe. Auto ISO can interfere with placement unless you understand how the camera applies compensation in the selected mode.
Adorama's David Bergman demonstrates how spot readings, tone placement, and modern digital limits connect:
Measure the scene's brightness range
One spot reading tells you how to place one tone. A second reading tells you whether the scene fits. Meter the darkest area where you need texture, then meter the brightest area where texture matters. Count the stop difference between them.
Imagine a dark tree trunk meters at exposure value 8 and a sunlit cloud meters at exposure value 14. The textured range spans six stops. If you place the trunk on Zone III, the cloud falls six zones higher on Zone IX. That may preserve little cloud texture. You can move the trunk to Zone II, accept a brighter cloud, bracket exposures, add light to the shadows, or wait for softer conditions.
The correct choice depends on the subject. A black silhouette can fall to Zone 0 without harming the photograph. A bare lightbulb can reach Zone X. A bride's textured dress, a product label, or a sunlit cloud may need to remain below clipping. Decide which details carry meaning before trying to preserve everything.
Digital sensors have asymmetric failure. Underexposed shadows may become noisy, lose color, or show banding when lifted. Clipped highlights contain no channel detail to recover. Raw files tolerate substantial adjustment, but neither end is unlimited. The Zone System gives you a way to choose the compromise before capture.
Calibrate zones to your own camera
Zone labels are more useful after you test the camera, raw converter, and normal output. A histogram based on a contrasty JPEG preview can show clipping before the raw file is actually clipped. Another picture style may hide clipping until a color channel is gone. Calibration replaces online folklore with evidence from your workflow.
Set up an evenly lit photographic gray card. Use raw capture, base ISO, manual white balance, manual exposure, and the lens aperture you normally trust. Meter the card, make the Zone V frame, then expose a series from five stops below to five stops above in one-stop increments. Keep the light constant.
Import the files with neutral raw settings. Note where texture disappears into black, when shadow color becomes unreliable, when the first color channel clips, and how the camera histogram predicted those limits. Repeat at a higher ISO if you regularly work in low light. The shadow limit may move even if the highlight behavior looks similar.
Print or export the sequence using your usual process. A display can show subtle values that a matte print cannot reproduce. Your practical Zone II and Zone VIII should reflect the final medium, not only the raw editor's brightest monitor view.

Use a field workflow that stays fast
The full Zone System can become slow if you meter every visible surface. Most digital scenes need one deliberate placement and one limit check. A repeatable workflow keeps the idea practical:
- Identify the subject and the detail that must survive.
- Choose a dark or middle tone whose intended brightness you can describe.
- Spot meter that tone and place it with manual exposure or compensation.
- Meter the brightest important texture or inspect highlight warnings.
- Adjust, bracket, add light, or accept clipping according to the photograph.
- Make a test frame and inspect the red, green, and blue channels when possible.
- Record a short sequence if light or subject movement changes quickly.
For a landscape, you might place dark wet rock on Zone III, then confirm that a bright waterfall stays below the clipping point. For a portrait, meter the lit side of the face, place it according to the intended mood, and check whether a white shirt or window clips. For a theater performance, protect lit faces and allow the unimportant background to disappear.
Do not chase the meter after every compositional change. If the light on the subject is constant, keep the exposure constant. Reframing can change the average brightness without changing the required exposure. That is one reason manual mode becomes calmer than automatic modes in stable light.
Protect digital highlights without starving shadows
The film version of the Zone System emphasizes exposing for shadows and developing for highlights. Negative film tolerates generous exposure and gives development control over contrast. Digital capture usually reverses the priority because clipped highlights fail abruptly.
Start by identifying the brightest highlight that needs texture. Place it below your tested clipping boundary, then see where the shadows fall. If important shadows land below your usable noise floor, the scene exceeds the single-frame range. Bracket, light the shadows, use a reflector, change the time of day, or accept a graphic black area.
This approach overlaps with expose to the right, but they are not identical. Expose to the right seeks the brightest safe raw exposure to maximize captured signal. Zone placement begins with how a subject should render. In practice, you can combine them: decide the tonal relationship, then move the whole exposure brighter until the important highlight reaches its safe limit.
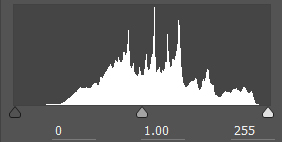
Enable the camera's red, green, and blue histogram if available. A luminance histogram can look safe while the red channel clips in warm skin or a sunset. Highlight warnings are also based on the embedded JPEG, so use a neutral profile and confirm the camera's raw headroom through testing.
A graduated neutral-density filter can compress a bright sky when the transition suits the horizon. Exposure bracketing is more flexible around trees, buildings, and irregular edges. The exposure bracketing guide explains frame spacing and blending choices.
Apply zones to common subjects
Snow scenes confuse reflected meters because most of the frame is brighter than a middle value. Spot meter clean snow and place it around Zone VII or VIII when you want texture. Check the brightest sunlit patch, since a shaded reading may not protect direct light. Fresh snow under flat cloud may need a different placement than sparkling snow in hard sun.
For portraits, place skin according to the person, light, and mood. Do not use a skin-tone chart as a rule. Check the bright side of the face, specular highlights, pale clothing, and reflective jewelry. In a low-key portrait, the subject's face may sit close to Zone V while the background falls below Zone II. In high-key work, the face and background can move higher without losing separation.
Dark interiors with bright windows may exceed the sensor's range. Decide whether the view outside matters. If it does, expose for the window and add flash or continuous light inside. If it does not, let the window become a clean bright shape. The Zone System cannot create dynamic range, but it makes the choice explicit.
At night, bright signs and streetlights can sit far above people and pavement. Protect color in the important sign, then decide how dark the street may become. A stable travel tripod allows base ISO and longer exposures for static scenes, but moving people still require an appropriate shutter speed.
Develop the raw file with the same plan
Raw editing completes the tonal decision. Start by setting white balance and overall exposure, then establish the black and white endpoints. Adjust highlights and shadows only enough to support the intended zones. If every dark area is lifted and every bright area is compressed, the photograph can lose the structure you planned in the field.
Use the tone curve to control relationships, not merely to add contrast. A gentle S curve can deepen Zones III and IV while preserving a luminous Zone VII. Local masks can separate a face from a background or keep cloud texture visible. Dodging and burning continue the original Zone System's concern with local print values, even though the tools are digital.
Check the capture metadata before comparing edits. The EXIF viewer reveals shutter speed, aperture, ISO, focal length, exposure compensation, metering mode, and other fields stored by compatible cameras. When two frames look different, metadata can show whether you changed zone placement, ISO, or shutter speed instead of blaming the raw converter.
Keep one neutral reference edit beside the creative version. The reference shows what the file contains, while the final edit shows what you intended. That distinction is useful when a dramatic curve or preset hides a capture problem.
Common mistakes and corrections
The first mistake is treating each zone as a fixed object. Grass is not always Zone V, skin is not always Zone VI, and snow is not always Zone VIII. Light, color, surface reflection, output, and creative intent change the placement.
The second mistake is trusting the meter without checking the other end of the range. Perfectly placing a dark rock can still clip a cloud. Take the second reading or inspect the histogram. The method needs both placement and range.
The third mistake is assuming all raw recovery is equal. A file that looks recoverable on the camera display may have a clipped color channel. Deep shadows can lift but reveal pattern noise. Calibrate the specific body at the ISO values you use.
The fourth mistake is overcomplicating a changing scene. Wildlife, street action, and events may not allow repeated spot readings. Meter representative light, choose a safe exposure, use highlight warnings, and concentrate on timing. A simplified Zone System is better than missing the photograph.
A compact Zone System checklist
Before pressing the shutter, ask four concrete questions:
- Important tone: Which area must retain texture or correct brightness?
- Placement: How far above or below the meter's middle reading should it appear?
- Range: Where will the brightest and darkest important details fall?
- Response: Will you expose once, bracket, add light, change conditions, or accept lost detail?
After capture, check the color-channel histogram, highlight warnings, focus, and motion. Do not evaluate tonal placement from screen brightness alone. A rear display set bright for daylight can make an underexposed file look correct.
The Zone System remains relevant because it teaches prediction. Histograms show what happened after an exposure. Zones help you decide what should happen before it. Once you can place one tone and check one limit, the system stops feeling historical and becomes a direct way to control digital exposure.