How to Shoot Panning Photography: Freeze the Subject, Blur the Background
As an Amazon Associate, ExifGrabber earns from qualifying purchases.
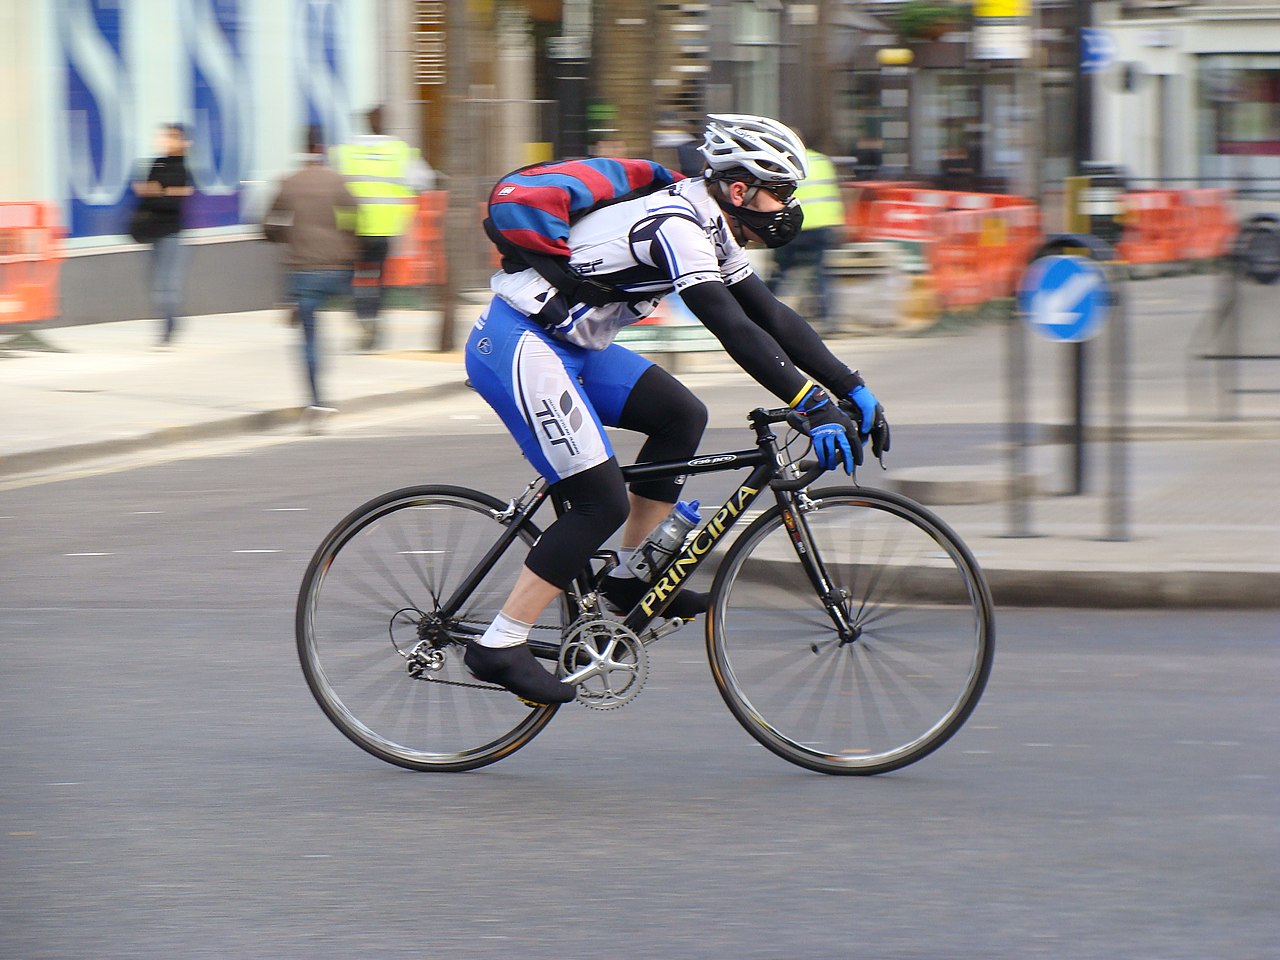
Panning is one of those techniques that looks like a special effect the first time you see it done well: a cyclist frozen in sharp detail, legs mid-pedal, while the road and background streak into horizontal lines of color and motion. It's not a Photoshop trick. It's a camera technique that's over a century old, and it's one of the more satisfying skills to actually nail because the difference between a keeper and a throwaway shot is immediately obvious on the back of your camera.
This guide covers the settings, the physical technique, and the mistakes that trip up almost everyone the first few times they try it.
What panning actually is
Panning means moving your camera to track a moving subject during a slow-ish exposure, so the subject stays roughly in the same position in the frame throughout the shot while everything static in the background moves relative to the camera and blurs into streaks. Your subject stays relatively sharp because your camera's motion is matching its motion. The background blurs because it isn't moving at all, it's your camera that's doing the moving.
It works on anything with predictable, sustained motion: cyclists, runners, race cars, motorcycles, birds in flight, even a kid on a bike in the driveway. The technique itself doesn't change, only the shutter speed you use to match how fast your subject is actually moving.
Camera settings for panning
Shutter speed
Shutter speed is the setting that makes or breaks a panning shot, and it's also the one most beginners get wrong by going too slow too fast. Start in the 1/60s to 1/125s range while you're learning the physical motion. Once you're consistently landing sharp subjects at 1/60s, drop down to 1/30s or even 1/15s for more dramatic background streaking. Fast-moving subjects like race cars or motorsport can tolerate faster shutter speeds, sometimes as quick as 1/250s, and still show background blur simply because of how fast the relative motion is.
There's no single "correct" shutter speed. It depends on your subject's speed, how far away you are, and how much blur you want. As a rough starting framework:
| Subject | Starting shutter speed |
|---|---|
| Walking or jogging person | 1/30s - 1/60s |
| Cyclist | 1/30s - 1/80s |
| Running dog | 1/60s - 1/100s |
| Car in city traffic | 1/60s - 1/125s |
| Motorsport / race car | 1/125s - 1/250s |
| Bird in flight | 1/100s - 1/250s |
Aperture and ISO
Because you're often shooting at a slower shutter speed than the light would otherwise call for, you'll need to close your aperture down to avoid overexposing, especially in daylight. F/8 to F/11 is a reasonable starting point outdoors. Keep ISO as low as your lighting allows, generally ISO 100-400, and only raise it if you genuinely need more shutter speed range to freeze the subject at a given aperture.
Shooting mode
Shutter priority mode (S or Tv on most cameras) is the easiest way to shoot panning, since it lets you lock in the exact shutter speed you want while the camera handles aperture. Some photographers prefer full manual once they're comfortable, which gives you more consistent exposure across a burst if the light isn't changing much. Either works; shutter priority is simply the faster way to learn.
Autofocus
Use continuous autofocus (AF-C or AI Servo, depending on your brand) with a subject-tracking or wide-area AF mode. Modern mirrorless cameras with animal, vehicle, or subject-detection autofocus make this dramatically easier than it used to be, locking onto a cyclist or car and holding focus as you pan. If your camera has a tracking AF mode, use it rather than a single, static AF point.
The physical technique
Stand with your feet planted roughly shoulder-width apart, facing the point where you expect to release the shutter, not the point where the subject first enters your frame. Twist your upper body toward where the subject will start, then rotate smoothly through the shot as it passes, keeping your feet still and letting the rotation come from your waist and hips.
Track the subject in your viewfinder before you press the shutter, matching its speed as closely as you can, and keep the same smooth rotational speed through the shutter release and for a beat afterward. Stopping your motion the instant you hear the shutter fire is one of the most common mistakes, since even a fraction of a second of mismatched motion at the end of the exposure introduces blur into your subject. Follow through, the same way you would with a golf swing or a tennis serve.
A monopod with a fluid head can make this motion much smoother than handholding, especially for longer telephoto lenses where camera shake is magnified. It's not required, but it removes a lot of the vertical wobble that ruins otherwise well-timed pans.
Composition tips
Leave room in the frame for your subject to move into, rather than centering them with no breathing room ahead. A cyclist moving left to right should generally have more space in front of them than behind, following the same logic as leading room in any moving-subject composition.
Shoot from a slightly lower angle when possible. It exaggerates the sense of speed and makes the background streaks read more dynamically than a straight-on eye-level shot. And don't be afraid of a busy or colorful background; panning turns clutter into abstract streaks of color, which often works in your favor rather than against it.
Burst mode and your keeper rate
Even experienced photographers don't nail every panning frame. Shoot in continuous burst mode and expect a fairly low hit rate when you're learning, often one usable frame out of every eight or ten. That's normal. As your tracking motion gets smoother and more consistent, your keeper rate climbs substantially. Review your shots on the back of the camera between attempts rather than waiting until you get home, since panning technique is one of the few areas of photography where you can diagnose and fix your form in real time.
If you shoot RAW, it's worth checking your actual shutter speed and focal length after a session in our free EXIF viewer to see exactly which settings produced your sharpest frames, since it's easy to lose track of what you changed mid-session when you're chasing fast-moving subjects.
Common mistakes
The most common mistake is choosing too slow a shutter speed before you've built the physical technique to match it, resulting in a blurred subject instead of a blurred background. Start slower than you think you need to and work your way down. The second most common mistake is stopping the pan motion the moment the shutter closes rather than following through, which introduces just enough mismatch to soften the subject. The third is forgetting to switch to continuous autofocus, leaving your camera hunting or locking focus on the wrong plane as the subject moves through the frame.
Practice subjects to start with
If you don't have easy access to cyclists or cars, a dog running in a park, a kid on a scooter, or even cars passing on a quiet residential street all work well for building the fundamentals. The technique transfers directly once you move on to faster or less predictable subjects like wildlife or motorsport.
Gear that helps (but isn't required)
You don't need specialized equipment to shoot panning, but a few pieces make it noticeably easier. A camera with reliable subject-tracking autofocus removes one of the two hardest parts of the technique, letting you focus entirely on the physical rotation instead of also worrying about focus drift. A lens with built-in image stabilization that includes a dedicated "panning mode" (common on many telephoto zooms) compensates for vertical shake while intentionally allowing horizontal motion, which is exactly what panning needs. If your lens has this mode, switch it on. It's designed for exactly this situation.
A monopod with a fluid video head is the single biggest upgrade for consistency, since it constrains your motion to a smooth horizontal arc and removes the vertical wobble that's almost impossible to eliminate handheld, especially with longer lenses. A neutral density filter is worth carrying if you're shooting panning shots in bright midday light, since it lets you keep a slow shutter speed without overexposing even at your lens's minimum aperture.
Editing panning shots
Panning shots generally need less post-processing than other action photography, since the effect is baked in at capture time rather than added afterward. That said, a few adjustments help. Boost clarity or texture slightly on the subject specifically (using a masking or radial filter in Lightroom or Photoshop) to make the sharp-versus-blurred contrast pop a little more. Avoid sharpening the whole frame globally, since sharpening the blurred background just adds noise without adding detail that isn't there.
Cropping is your friend if your framing wasn't perfect in-camera. A tighter crop around the subject, respecting the same leading-room principle from your original composition, often improves a panning shot more than any color or exposure adjustment will. If you shot in RAW, check the actual shutter speed you used in our EXIF viewer so you know what worked and what to repeat next time you're shooting similar subjects.
Frequently asked questions
What's the best shutter speed for panning photography? There's no single answer, but 1/60s is the most common starting point for learning the technique on moderate-speed subjects like cyclists or joggers. Adjust up or down depending on subject speed and how much background blur you want.
Can I do panning photography with a smartphone? Some phones support manual or "pro" shooting modes with adjustable shutter speed, and the technique works the same way, though the smaller sensor and lack of a dedicated viewfinder make tracking a fast subject noticeably harder than with a mirrorless or DSLR camera.
Why does my panning shot come out completely blurred, including the subject? This usually means your rotational speed didn't match the subject's speed closely enough, or you stopped moving the camera before the exposure finished. Slow down your shutter speed less aggressively while you're still building consistency, and focus on a smooth follow-through past the shutter release.
Do I need a tripod for panning? No, and in fact a standard tripod will restrict the motion you need. A monopod with a fluid head helps, but plenty of great panning shots are captured entirely handheld once your technique is dialed in.
Final thoughts
Panning rewards repetition more than gear. A kit lens and a cheap subject like passing traffic will teach you the technique just as well as a $2,000 telephoto and a professional race track. Start around 1/60s, focus on a smooth follow-through rotation rather than a perfect shutter speed, and expect your keeper rate to climb fast once the motion clicks. It's one of the few technical skills in photography where the "aha" moment is genuinely visible the first time you get it right.